
Beauty Beneath the Surface
- Nov 14, 2015
- 6 min read
I am in love with my apartment; it’s sunny, spacious, has two decks and more closet space than I can handle. Unfortunately, when I moved in I had very little furniture. Even after donating one of the bedrooms to my dog (don’t judge me…) I was still left with a lot of unfurnished space and soon discovered a universal fact: furniture is expensive; good furniture is out of my league.
I was in desperate need of a dresser, and as luck would have it a neighbor was having a yard sale the same week I moved in – and selling a solid-wood dresser for dirt-cheap. The dresser was large and sturdy – but old and a bit… ugly. The varnish had yellowed and the wood had nicks and bruises.
I wondered… could I renovate the dresser?
Of course, I bought it.
Looking at it made my eyes a little sore. It was really ugly.

This is what my dresser originally looked like, though on this image I've already added metal legs to raise it.
I searched the web for renovation techniques and found out that simply painting the dresser was not the best idea. Why own a solid-wood dresser and hide the beauty and complexity of the wood? Besides, simply painting it seemed like the easy way out, and I’m no sissy :-)
My options then were to sand the dresser, stain it and varnish it.
So here goes…
If you want to renovate your old wood furniture, Home Depot has to become your best friend. It has a wide selection of products, all under one roof. Unfortunately, they’re not paying me for sharing this with you (they should be!).
Dictionary

Sanding – removing an old layer of varnish/paint/stain/coating from wood to reveal its natural color and properties.

Sandpaper – paper covered with abrasive (scratchy/rough/course) material used for smoothing or polishing wood and other surfaces. Comes in a variety of grits (degrees of coarseness). A 220 grit is used for final touches – 80 grit is used for removing old varnish.

Sander – a sander is a power (electric) tool used for sanding. It usually has a rotating (spinning) end that you attach sandpaper to.
(OMG! I ended a sentence with a preposition! Shame on me!)

Wood stain – wood is absorbent; it soaks up moisture. Wood stain is a type of paint that penetrates the wood and dyes (colors) its surface. The natural texture of the wood is still visible through the stain which is why it is preferred to actual paint, which covers the wood completely. Comes in a wide range of colors.

Varnish – a clear and hard protective finish used for wood and other surfaces. Varnish resembles clear nail polish.

Foam brush – a brush made of soft, absorbent foam. It is the quickest and easiest way to apply both stain and varnish because it ensures even coverage.
Shopping List
Sandpaper or electric sander (prices vary)
This part is a bit tricky. I did not want to spend a lot of money on an electric sander so I decided to buy sandpaper and do the work manually, by hand. It was probably not the best idea because sanding wood is hard work and very time-consuming (and messy!). If you want to save time and make the job a lot easier, buy or rent a small sander.
Even if you do decide to buy a sander, you still need to purchase sandpaper. You will need 3 grits (levels of coarseness).
80 grit – very course. Used for removing old varnish and paint.
150 grit – used for smoothing out the wood after you’ve sanded it with the 80 grit.
220 grit – very fine. Used for polishing/finishing the wood and in-between layers of varnish.
If you’re going to sand your furniture manually, you will need to purchase large, rectangular pieces of sandpaper. If you’ll be using a sander – you will need to buy smaller pieces of sandpaper that fit in your sander.
Wood stain (about $15)
There are very many colors to choose from – I recommend staining a small hidden area first to make sure you like the color. I also recommend using a water-based varnish because it dries faster and does not smell as much.
Varnish (about $15)
Decide whether you want your furniture to have a glossy (shiny) finish, or a matte (not glossy) finish, or something in between. Again, I recommend a water-based varnish for the same reasons as above.
It’s actually possible to buy a 2-in-1 stain and varnish, but it’s more difficult to work with and any mistakes will be more noticeable, so I recommend getting 2 separate products.
Foam brushes (about $1 per brush)
I bought a few – both wide ones and narrow ones. Purchase at least four (two for staining and two for varnishing).
A few rags or washcloths (you already have them around your house, somewhere)
You will need them to remove dust and sanding residue.
Accessories (prices vary)
I decided to add metal legs to my dresser to change its form a bit and to raise it a little. I paid about $40 for the legs (on Amazon). You can also purchase new handles for your dresser. Home Depot has a wide selection.
Apart from adding legs I also decorated my dresser using gold (i.e. gilding). You can read my article about the gilding process here.
Getting the work done
1. Find a space. Sanding is very messy – don’t do it indoors. You will have sawdust everywhere. Everywhere. Sand your furniture outside or – if you absolutely must do it indoors – cover any other pieces of furniture with sheets and prepare to spend a long time cleaning up afterwards.
2. Sand your furniture until there’s no trace of paint/stain/varnish. If you do a poor job, the stain will not penetrate properly and your work will be ruined. Use 80 grit sandpaper to remove any coating. This took me, on and off, about a month. I think I even developed muscles on my arms :-)

3. Polish/finish your furniture with 150 grit sandpaper. This will smooth out the wood and remove any rough surfaces/splinters/etc. Remove all access dust with a moist rag and allow the wood to dry thoroughly. If you’ve decided to add legs to your furniture, now is the time to do so.
4. Stain your furniture. This process is not too messy but you should still protect your floor from spills and splashes. Apply a layer of stain with your foam brush then allow a few minutes for the stain to work its magic. Now remove access stain with a dry rag. If you want a darker color, stain it again, allow a few minutes once more for the stain to penetrate, then wipe again. Allow your stain to dry for a few hours (read the instructions on your product – drying times vary).

5. Apply varnish. Once again, protect your floors from spills. Make sure to wipe any spills with a wet rag as soon as you spot them – once the varnish dries it may be too late! Apply a very thin and even layer of varnish. Make sure the entire surface of the wood is evenly covered and that there are no leaks or spills. Allow the first layer to dry thoroughly, at least 2 hours or as recommended by the manufacturer.
Once the first layer is dry, carefully sand it with 220 grit paper to remove any air bubbles or imperfections. Apply a second layer and let your piece dry overnight.

6. You may now add handles of your choice or decorate your furniture. I added tree branches using gold leaf – I think, overall, the project was a big success!
I am very glad that I made the effort to renovate my dresser. I’m not going to lie – it was difficult and took me a long time, but so worth it! I turned my ugly, old piece of furniture into an artistic piece with soul.
I had no previous skills or experience before I began my project – just stubbornness and determination. If I can do it, so can you!
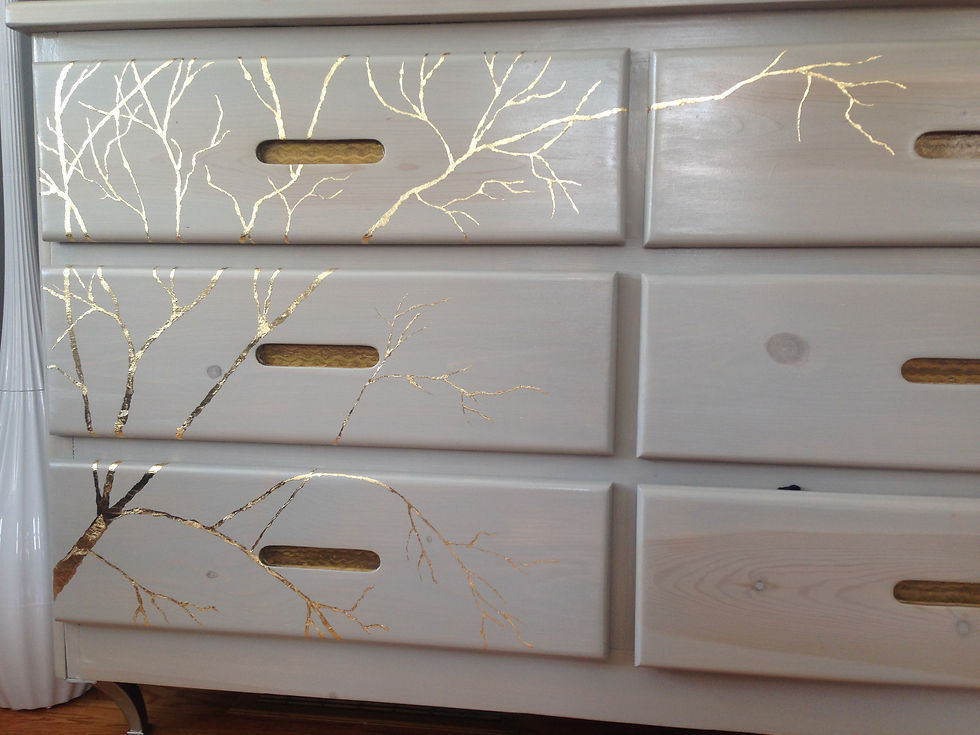
Here's a pic of my dresser - sanded, stained, varnished and gilded!
Comments