If Gold Grew on Trees
- Paulina
- Aug 23, 2015
- 5 min read
About a year ago I was at an art store and stumbled upon an interesting item: a little square paper envelope with “Gold Leaf” written on it. “What’s this for?” I asked the clerk. “It’s for gilding,” he answered.
What’s gilding?
Ah. Gilding is the process of applying gold to objects, such as wood, metal or canvas. It’s a wonderful, time-honored decorative technique – and if you’re creative, patient, love the sheen of gold and are (terribly, horribly) stubborn, you may want to try it out!
First things first – you have to buy a few items, and you gotta be a little snobby about what you call them.
SHOPPING LIST:

Base. Called a “primer”. You apply this to the surface of the object you want to cover with gold (or gild) to ensure that your glue (step 2) sticks better and more evenly. It is important to select the right primer (one that is suited for the object you will be working on. I learned that one the hard way). It costs around $15 a jar.

Glue. Well, I call it a glue but the label on the bottle says “size”. Unfortunately, it does not come in XS-XXL (I asked, no one laughed). Yes, you will be using glue to attach gold to your surface. Again, choose a glue (I mean, size) that is designed for your surface. If you want to gild on paper – choose a water-based size. If you want to gild on metal – choose an oil-based size. The size also costs around $15 a jar.

Gold leaf. Gold is expensive, right? Well, if you want to gild using authentic (real) gold be prepared to make an investment of at least $100 for a mere 5 square feet. BUT – you can get imitation gold leaf a lot cheaper – at about $12 for the same coverage. It looks just as nice. What you are buying is a small book filled with golden sheets (leaves) – the leaves are very (very, very, very!!) thin. DO NOT TOUCH THEM UNITL YOU’RE READY TO USE THEM! They might stick to your fingers and rip!

Varnish. This will protect your gilded surface and make sure that the leaf does not tarnish (turn dark as a result of reacting with the elements). You only have to use it with imitation gold leaf – real gold is very durable. Varnish costs (you guessed it) around $15 a jar.

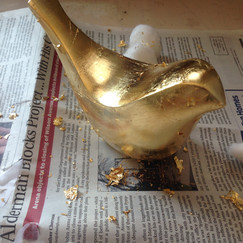
Surface. The object you want to gild. I’ve worked on ceramic vases (my first project – went terribly wrong), wood (I worked on a dresser, this project actually turned out nice), or paper/canvas (I have wasted countless leaves trying to get the right primer/size combination). Choose a small object to practice on. I have chosen a small, simple ceramic bird. It's smooth, which will make my job much easier.
You will also need:
a piece of 200 grit sandpaper (you can get it at Home Depot),
cotton balls (you can get them at any Walgreens),
a good bristle brush (for applying the primer and size – available at art supply stores – make sure the bristles do not come out!),
a foam brush (for applying varnish – you can get it at Home Depot or an art supply store),
a brush made from squirrel hair - it will not attach to the gold leaf and helps smooth things out. These can cost upwards of $30, but are totally worth it.
steady hands (not sure where to buy them, but might be expensive),
and patience (available at your local patience center).
Admire your collection of shiny jars and supplies. Line them up. Pretty, right? Now it’s time to get to work!
DOING THE WORK:
STEP 1:

Prepare your surface. Make sure it’s dust free and clean. Place it on a newspaper to protect your worktable.
(I knew there was a reason they still printed newspapers…).
STEP 2:

Apply the primer. In my case – it will be acrylic primer as I will be working on a small ceramic figurine of a bird (fingers crossed!). Plus, acrylic primer does not smell as bad as oil-based and is easier to work with. Primer seals and evens out the surface. VERY IMPORTANT: Make sure you apply a THIN and EVEN layer of primer. Why even? Because every imperfection will be visible once you apply the gold leaf (this is because the leaf is so thin!!).
STEP 3:
Allow the primer to dry thoroughly! (I told you you had to be patient!)
STEP 4:

Use your sandpaper on the primer. Smooth out any bumps and imperfections you find. Do this GENTLY! 200 grit sandpaper is very fine and perfect for finishing touches. Once you’re done, wipe any remaining dust.
STEP 5:

Apply the size over the primer. I like doing this with a foam brush as it creates a smoother finish than bristle (the hair on a “regular” brush). Again, it’s important for the layer of size to be THIN and EVEN. Carefully cover the entire surface.
STEP 6:
Wait approx. 30 minutes to an hour, depending on the instructions on your size. The size can’t be wet – just “tacky”. When you touch it with your finger it should be sticky like the back of a post-it note.
I hate waiting for things to dry!!!!!
STEP 7:
CAREFULLY, as if you were handling an infant, open your book of gold leaf. CAREFULLY take a piece and place it on the size. You can cut the leaf into smaller pieces – this makes it easier, especially if you're working on a small object. (Additional tip: do this in a room without a draft or air circulation. Turn off your fan – the gold leaf likes to sail away!). Cover your surface with the leaf.
Next, make sure the leaf is sticking to the size. Use a brush (squirrel bristle) or the waxy paper in your gold leaf book to gently press on the leaf. If you're working on a small surface you can also try using your fingertips.
Work slowly until you cover the entire surface.
STEP 8:
Wait. Yes, wait. Leave it overnight. DON'T TOUCH IT!
STEP 9:
Is it the next day? Are you sure? OK. Take a cotton ball and rub it against the surface of the leaf. This will remove extra leaf and reveal all the places where the leaf did not attach to the surface (these annoying patches are called “holidays” but this might be just to further annoy us!).
STEP 10:
Patch up any holidays with your size and wait once again (yes! Overnight!! Argh!!). Rub cotton over surface again. Repeat the patching process if necessary (along with the waiting process. Curse you, holidays!)
STEP 11:
No more holidays? Everything looks good? Wonderful :-) You can now apply the varnish. I use a foam brush. One layer should do the trick. Watch out for air bubbles forming. Some varnishes go on milky-white but turn clear when dry.
STEP 12:
Wait for the varnish to dry. Yes, overnight.
STEP 13:

Admire your awesomeness.
You are awesome!
Tell your friends you are a gilder.
“What’s gilding?” they’ll ask.














Comments